Pat Shaughnessy

Ribadesella, Spain

Paperclip sample app

April 30, 2009 · 50 comments

(Update October 2009)
I just updated a gem I wrote called View Mapper that will generate all of the code I describe below… you can use View Mapper to generate working scaffolding code that uploads/downloads files using Paperclip, or only view scaffolding code that works with an existing model in your app; for more details see: http://patshaughnessy.net/2009/10/16/paperclip-scaffolding


I love scaffolding. Many experienced Rails developers scoff at the idea of using scaffolding to generate Rails code: it’s ugly; it probably means you don’t understand how to write the code yourself; it generates a lot more code than you need, etc., etc. However, for a beginning Rails developer working on her/his own like me who isn’t surrounded by a team of Ruby experts, scaffolding is an essential tool and can help to get started in the right direction. Also, even for experienced Rubyists scaffolding can be a great way to quickly (minutes, not hours or days) get a simple app up and running to use for demos, UI wireframes, spiking some technical issue, etc.

This post will demonstrate how to use scaffolding to create a new Rails app from scratch that uses the Paperclip plugin to upload and display an image file. Feel free to copy/paste pieces of code from the narrative below and use them in your app, or you can just skip to the chase and get the finished version from github and run that on your machine.

There are a lot of other good tutorials out there about this; see:

I’ll take on the risk of repeating material that’s already out there in order to show how easy it is to get a working Paperclip application up and running using scaffolding. The fact that just a few commands and lines of code are required illustrates just how simple and powerful Paperclip’s design is. In my next post, I’ll proceed to change this sample app to demonstrate how to save the uploaded files in a database column instead of on the web server’s file system, using my modified version of Paperclip.

FYI At the time I wrote this, Rails was at version 2.3.2:

$ rails --version
Rails 2.3.2

Let’s get started by creating a new Rails application:

$ rails paperclip-sample-app
      create  
      create  app/controllers
      create  app/helpers
      create  app/models
      create  app/views/layouts
      create  config/environments
      create  config/initializers
      create  config/locales
      create  db
      create  doc
      create  lib
      create  lib/tasks
      create  log
      etc...

Before we go any farther, let’s setup our database.yml file and create a new MySQL database to use with the sample app. Replace the contents of config/database.yml with this:

development:
    adapter: mysql
    database: paperclip_sample_app_development
    username: root
    password: 
    host: localhost

Enter the proper username and password for MySQL if they are not “root” and null. And then run this from the command line:

$ cd paperclip-sample-app
$ rake db:create
(in /Users/pat/rails-apps/paperclip-sample-app)

Ok, now we have a MySQL database to work with. Next, let’s go ahead and install the Paperclip plugin. The best thing to do is just to get the latest version from github; Thoughtbot frequently updates it with bug fixes, enhancements, etc.:

$ ./script/plugin install git://github.com/thoughtbot/paperclip.git
Initialized empty Git repository in /Users/pat/rails-apps/paperclip-sample-app/vendor/plugins/paperclip/.git/
remote: Counting objects: 62, done.
remote: Compressing objects: 100% (50/50), done.
remote: Total 62 (delta 6), reused 39 (delta 4)
Unpacking objects: 100% (62/62), done.
From git://github.com/thoughtbot/paperclip
 * branch            HEAD       -> FETCH_HEAD

Now that we have an empty, shell application created and the Paperclip plugin installed, we can use scaffolding to add some working code to it. Let’s use the same “user” and “avatar” example Thoughtbot does on the Paperclip project page. The idea is that the sample will contain a table of users, and each user will have an avatar image displayed in the web site. So to get started, I’ll just create a new “user” model with string columns for the name and email address:

$ ./script/generate scaffold user name:string email:string
      exists  app/models/
      exists  app/controllers/
      exists  app/helpers/
      create  app/views/users
      exists  app/views/layouts/
      exists  test/functional/
      exists  test/unit/
      create  test/unit/helpers/
      exists  public/stylesheets/
      create  app/views/users/index.html.erb
      create  app/views/users/show.html.erb
      etc...

Now we need to generate the database columns necessary for Paperclip on our new model object using script/generate:

$ ./script/generate paperclip user avatar
      exists  db/migrate
      create  db/migrate/20090430084151_add_attachments_avatar_to_user.rb

And let’s go ahead and create the users table using db:migrate:

$ rake db:migrate
(in /Users/pat/rails-apps/paperclip-sample-app)
==  CreateUsers: migrating ====================================================
-- create_table(:users)
   -> 0.0031s
==  CreateUsers: migrated (0.0032s) ===========================================

==  AddAttachmentsAvatarToUser: migrating =====================================
-- add_column(:users, :avatar_file_name, :string)
   -> 0.0063s
-- add_column(:users, :avatar_content_type, :string)
   -> 0.0069s
-- add_column(:users, :avatar_file_size, :integer)
   -> 0.0085s
-- add_column(:users, :avatar_updated_at, :datetime)
   -> 0.0081s
==  AddAttachmentsAvatarToUser: migrated (0.0311s) ============================

You can see that the Paperclip generator created columns in the users table called “avatar_file_name,” “avatar_content_type,” “avatar_file_size” and “avatar_updated_at.” Now we have our database schema setup. The next step is to just modify the code that was generated for us by the scaffolding and make the changes necessary for Paperclip. The first thing to do is to add a line to the user model and indicate that it has a file attachment called “avatar.” To do this, open app/models/user.rb and just add this one line:

class User < ActiveRecord::Base
  has_attached_file :avatar
end

And then edit the new user form (app/views/users/new.html.erb) and add a file field to use to upload files. There are actually two code changes you need to make: first you need to set the HTML form to encode the uploaded file data (and other fields) using MIME multiple part syntax, and then second you need to actually add the file upload field. Here’s the finished new.html.erb file with these two changes in bold:

<h1>New user</h1>

<% form_for(@user, :html => { :multipart => true }) do |f| %>
  <%= f.error_messages %>

  <p>
    <%= f.label :name %><br />
    <%= f.text_field :name %>
  </p>
  <p>
    <%= f.label :email %><br />
    <%= f.text_field :email %>
  </p>
  <p>
    <%= f.label :avatar %><br />
    <%= f.file_field :avatar %>
  </p>
  <p>
    <%= f.submit 'Create' %>
  </p>
<% end %>

<%= link_to 'Back', users_path %>

Also make the same changes to the edit form that was generated by the scaffolding: app/views/users/edit.html.erb. The best thing to do would be to include the same ERB file (maybe called “_form.html.erb”) in both the new and edit form files. Ideally the scaffolding generator would have done this for us…

Now if we run our application we can upload an image file and attach it to a user:

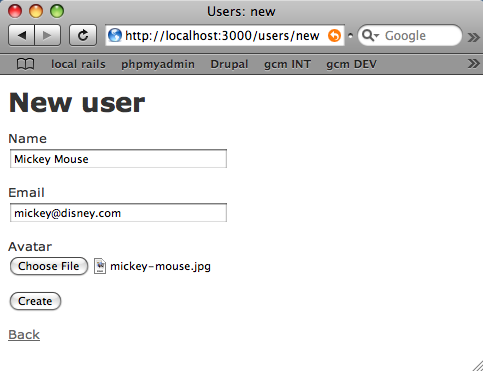
If you submit this form, the image file will be uploaded to the server and saved on the file system. By default, Paperclip saves files inside a “system” folder it creates in your Rails app’s public folder. Let’s take a look at my public folder and see where the file went:

$ find public/system
public/system
public/system/avatars
public/system/avatars/1
public/system/avatars/1/original
public/system/avatars/1/original/mickey-mouse.jpg

This is one of the nice things about Paperclip: it just works. I don’t have to think about or worry about where the files are going to go; Thoughtbot has chosen simple default values that make sense. Here we can see that there are a series of folders created that correspond to the attachment name, model primary key and also the “style” of the attachment (more on that below).

If you want to or need to save the files in some other place on your server’s file system you can specify different options to has_attached_file in your model; see this write up for an example: http://travisonrails.com/2009/01/11/Changing-Paperclip-File-Storage-Location. Paperclip also supports saving the files in Amazon’s S3 storage service, and in my next post I’ll demonstrate how to save the file data inside the database itself, right in the users table in this example.

I’m almost done; now I just need to display the uploaded image somewhere; the simplest thing to do is just to add an image tag to the users show page. Again, my changes to the standard scaffolding code are in bold:

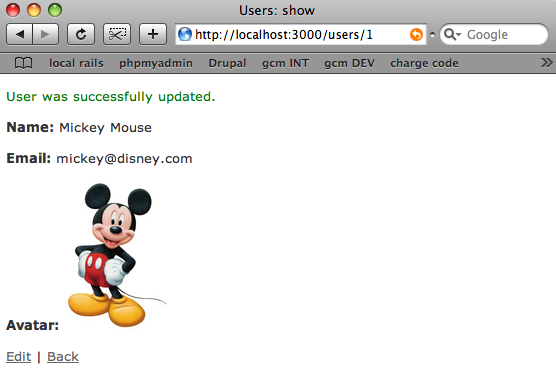
<p>
  <b>Name:</b>
  <%=h @user.name %>
</p>

<p>
  <b>Email:</b>
  <%=h @user.email %>
</p>

<p>
  <b>Avatar:</b>
  <%= image_tag @user.avatar.url %>
</p>

<%= link_to 'Edit', edit_user_path(@user) %> |
<%= link_to 'Back', users_path %>

Now we can see the image for our new user:

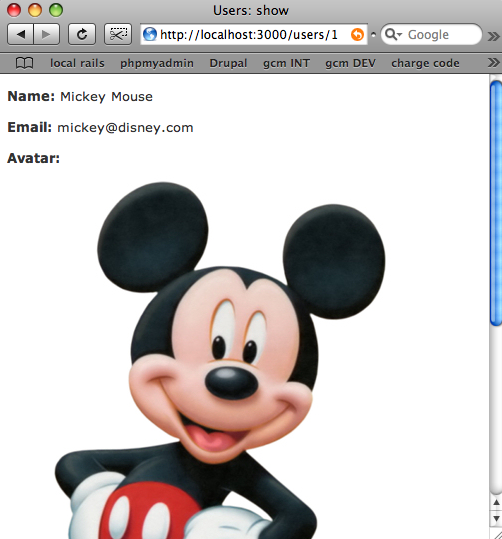
Since this image is bigger that what I would like, I can take advantage of Paperclip “styles” feature to generate a smaller version of it. To do that you will need to be sure you have ImageMagick installed on your server, which is what Paperclip uses behind the scenes to modify image files. Then all you need to do is just add two “styles” to your model, like this:

class User < ActiveRecord::Base
  has_attached_file :avatar,
                    :styles => {
                      :thumb => "75x75>",
                      :small => "150x150>"
                    }
end

The strings we pass in are actually options for ImageMagick's "convert" command; see it’s documentation for more details. And now in the show ERB we can just specify the “small” style in the image tag instead:

<%= image_tag @user.avatar.url(:small) %>

To see it, first I need to re-edit and re-upload the image (remember to add the file field code to edit.html.erb just like for new.html.erb):

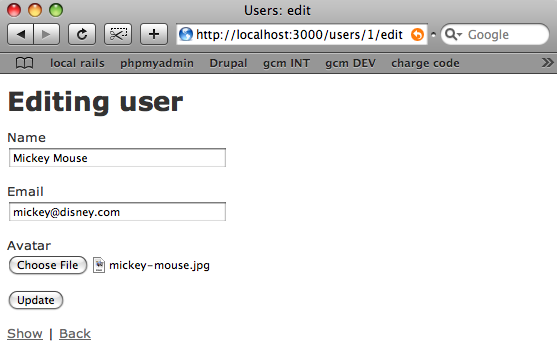
Now when this form is submitted we will see the smaller image:

And let’s take another look at the public/system folder and see what Paperclip and ImageMagick have done for us:

$ find public/system
public/system
public/system/avatars
public/system/avatars/1
public/system/avatars/1/original
public/system/avatars/1/original/mickey-mouse.jpg
public/system/avatars/1/small
public/system/avatars/1/small/mickey-mouse.jpg
public/system/avatars/1/thumb
public/system/avatars/1/thumb/mickey-mouse.jpg

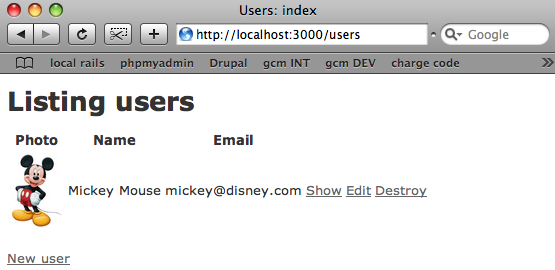
Again, this is very simple and just works! As a last step, let’s add the thumbnail image to the users index page so we can see Mickey without even clicking on that user record. This is as simple as editing app/views/users/index.html.erb and adding a new table column:

<table>
  <tr>
    <th>Photo</th>
    <th>Name</th>
    <th>Email</th>
  </tr>

<% @users.each do |user| %>
  <tr>
    <td><%= image_tag user.avatar.url(:thumb) %></td>
    <td><%=h user.name %></td>
    <td><%=h user.email %></td>
    <td><%= link_to 'Show', user %></td>
    <td><%= link_to 'Edit', edit_user_path(user) %></td>
    <td><%= link_to 'Destroy', user, :confirm => 'Are you sure?', :method => :delete %></td>
  </tr>
<% end %>
</table>

And now we just need to refresh the index page since the thumb image file was already generated:

And there you have it: a working file upload web site written in minutes. This was made possible by Rails scaffolding, and Paperclip's simple, elegant design.

Tags:·

50 responses so far ↓

  • 1 Alex // May 14, 2009 at 04:47 AM

    Thanks Pat for the very good tutorial for people who haven't used rails for long. It's much better to look at the functions of plugins like paperclip in a demo-app than in one's project at first. Cheers, Alex
  • 2 Lee // Jun 17, 2009 at 03:18 PM

    Nice work on the tutorial. But isn't this pretty much the same thing found everywhere else? I've yet to see a Paperclip tutorial that illustrates multiple attachments (not simply a column on a model) and how to use the new nested forms functionality of Rails 2.3 to attach many Attachments to a parent object. That would be cool...
  • 3 pat // Jun 17, 2009 at 05:41 PM

    Lee - you're right. That sounds like it would be fun and interesting to write. Nested attributes + Paperclip... I'll put it on my list of things to do :) I admit this article is similar to most of the other tutorials out there. But I thought it was worth repeating as a setup for my parts 2 and 3; also showing the command line steps and scaffolding code changes explicitly can be a big help for people just starting out with Rails.
  • 4 pascal // Jun 19, 2009 at 01:18 PM

    nice and simple, that exactly what i needed for a first step. you can perhaps add "git clone git://github.com/thoughtbot/paperclip.git", for the newbie like me that doesn't have clone. Thanks
  • 5 heckubiss // Jul 07, 2009 at 06:06 PM

    Thanks for this tutorial. it is perfect for noobs like me. I followed 4 different paperclip tutorials and only this one worked for me!
  • 6 heckubiss // Jul 07, 2009 at 06:08 PM

    Is there anyway to only store the thumbnails or small images on the web server? currently if users want the can upload 100 meg files!!!
  • 7 pat // Jul 08, 2009 at 06:13 AM

    Thanks… to keep images small, you can use validates_attachment_size, like this:
      validates_attachment_size :avatar, :less_than => 2.megabytes.
    Check the ThoughtBot documentation for more validation methods: http://dev.thoughtbot.com/paperclip/classes/Paperclip/ClassMethods.html.
  • 8 heckubiss // Jul 08, 2009 at 05:25 PM

    I was thinking more of allowing my users to upload any size (within reason), but then converting it to a smaller size on the server before storing.
  • 9 pat // Jul 09, 2009 at 05:05 AM

    Try using “original” as one of the styles; so in my sample app you could use this in user.rb:

    has_attached_file :avatar, :styles => { :thumb => "75x75>", :original => "150x150>" }

    This would resize the original file to be the specified size, and also create a thumbnail.

  • 10 gil // Sep 08, 2009 at 11:30 AM

    THANKS!!!
  • 11 about2flip // Oct 08, 2009 at 07:19 PM

    Great Tutorial, but can't you use photo instead of avatar, and also how do you install imagemagik for ruby? I can't find good install tutorial.
  • 12 pat // Oct 08, 2009 at 11:39 PM

    Thanks... yes you can use any name for the attachment you want; just change "avatar" to "photo" throughout the code above.

    Here's a link to the imagemagick install instructions; there are detailed instructions for how to install it for Unix, Mac and Windows: http://www.imagemagick.org/script/binary-releases.php

    Hope this helps.

  • 13 about2flip // Oct 09, 2009 at 04:27 AM

    Great Tutorial, so far so good everything is working. I'm stuck. I am on a windows xp system while I am learning ROR. So if I install the windows ver. of ImageMagik will the commands still work to create thumbnails?
  • 14 pat // Oct 09, 2009 at 07:06 AM

    Yes, both Paperclip and ImageMagick should work on Windows although I haven’t tried it myself so I’m not completely sure.

    If you’re having trouble only with ImageMagick, then I would try the “convert logo: logo.gif” command mentioned at the bottom of the install instructions I linked to just above. You also might have to add ImageMagick to your Windows PATH environment variable in order for Paperclip/Ruby to be able to find and execute it. Paperclip just executes the “convert.exe” program to run ImageMagick, so if the folder containing convert.exe is in your Windows PATH it should work.

  • 15 about2flip // Oct 10, 2009 at 01:45 PM

    Got everything to work. Great Tutorial. THANK YOU SO MUCH!!!
  • 16 about2flip // Oct 17, 2009 at 07:39 AM

    Hi, I am trying to add a column to an existing DB called image. so I do script/generate paperclip modelname image and then I do a rake, but I am getting a rake aborted because other columns exist. Can I do a migrate with paperclip? script/generate migration paperclip Thanks for your help.
  • 17 pat // Oct 17, 2009 at 08:22 AM

    You had it correct: script/generate paperclip modelname image is exactly what you want to run, followed by rake db:migrate. This should have created a new migration file for you to add the image_file_name, image_content_type, image_file_size and image_updated_at columns to your existing model. I'm not sure why it didn't work for you when you ran rake db:migrate... possibly you already had a column in your model with one of these names? Can you post the precise error message you get from rake db:migrate?
  • 18 about2flip // Oct 17, 2009 at 05:15 PM

    I fixed the error I was getting. I just dropped the whole table and did it again. Unfortunately I am running into another issue. My thumbs, or small are coming up with the name of the filename vs. the image. The thumbs work on this example. So I decided to try it on my own on another, and the big image shows, but not the small ones. I have been staring at my short code all day, and cant figure out why it works with your tutorial, but not with mine. I have googled to see why the words of the name of the file is showing vs. the actual thumb. Any suggestions why? Thanks Again.
  • 19 about2flip // Oct 17, 2009 at 05:46 PM

    Never mind, I figured out what I was doing wrong. I didn't know that you have to reload a new image when you change something in the code referencing to thumbs, or small. All day it took me to figure it out. So after I deleted a record and then reloaded it, it worked. Thanks Pat for this excellent tutorial.
  • 20 jon // Oct 24, 2009 at 01:59 PM

    awesome tutorial. I'm trying some modifications and am wondering about the best way to do this. Say the user uploads a 500x500 avatar. It will be reduced to 150x150 on the show.html.erb and thumb size on the index.html.erb but i'd also like to have the option for the user to select "original size" on the show page and reload the page with the original size avatar instead of the small one. What is the best way to accomplish this? Thanks!
  • 21 pat // Oct 25, 2009 at 07:54 AM

    Hi jon, basically you just need to create a new link on the show view that selects the "other size" and then handle that in your controller and later pass it into Paperclip when you redisplay the page. Here's some code I hacked up this morning; I used a helper function to keep the view code clean:
    http://pastie.org/668863
  • 22 about2flip // Oct 26, 2009 at 10:43 AM

    Pat, I got a question. How can I do multiple image attachments on one submit. I want user to sumbit original size, thumbnail size, and something else. How can I set that up. Thanks
  • 23 pat // Oct 26, 2009 at 08:41 PM

    Hi again - If you want to submit exactly two or exactly three photos, then just repeat “has_attached_file” as necessary, and also repeat the file field in your form; for example:

    has_attached_file :photo
    has_attached_file :thumb_photo
    has_attached_file :something_else

    On the other hand, if you need to be able to handle any number of photos per user then you need a separate model with a has_many association. This is more complicated, and you’ll have to use the nested attributes feature to make it work.

  • 24 Jeff Pritchard // Nov 01, 2009 at 10:08 PM

    Having an issue. It only works for .gif files for me. This is true on both my mac and my deployed redhat server. With .gif files the params returned to the create method look like this: "image"=>{"name"=>"test 3", "photo"=>#<actioncontroller::uploadedstringio:0x23db2cc>} but when I try a jpeg, the params look like this: "image"=>{"name"=>"misty", "photo"=>#<file: />} It seems like this would be a problem with the "multipart" thing in the form tag, but it looks right, and the html comes out looking right too: <form class="new_image"> Anybody? thanks, jp
  • 25 Jeff Pritchard // Nov 01, 2009 at 10:09 PM

    oops, the html didn't come through in the post above. The form tag has this in it: enctype="multipart/form-data" as expected.
  • 26 pat // Nov 02, 2009 at 10:25 AM

    Hi Jeff, Hmm – weird. I can’t reproduce the problem; it works for me with both JPEG and GIF files. However, I was able to reproduce the behavior you have with "photo"=>#<actioncontroller::uploadedstringio appearing sometimes in the log file and "photo"=>#<file: /> appearing other times. On my local setup using an older version of Rails (2.1.0) I was getting ActionController::UploadedStringIO when the uploaded file was small (about 10k or less) for both GIF and JPEG, but for larger files I was getting the <File:/var/folders/kW/kW-W-aidH1qhj9KHKk9kzE….. syntax. Note that I saw the full temp path of the uploaded file in the File object. For the latest versions of Rails (2.3.4) I don’t see this difference at all. I’m also using Leopard.

    So… possibly you’re having problems uploading larger image files, regardless of their type? Try uploading a small JPEG file and see if that works.

    Also try creating a new Rails 2.3.4 app and see if you have the same behavior and problems. When I have more time I’ll see if I can try harder to reproduce it…

  • 27 about2flip // Dec 07, 2009 at 01:40 PM

    Hi, I am now working under linux, and when I go to my show the filename location is where the picture is suppose to be displayed not the image. I have rmagick installed. Any suggestions? Thanks
  • 28 pat // Dec 07, 2009 at 05:32 PM

    Are you sure you have “image_tag” in your show view code? Maybe by mistake you have:
    <p>
      <b>Avatar:</b>
      <%= @user.avatar %>
    </p>
    or
    <p>
      <b>Avatar:</b>
      <%= @user.avatar.url %>
    </p>
    ... which would display the url or path of the file. To display the image you need:
    <p>
      <b>Avatar:</b>
      <%= image_tag @user.avatar.url %>
    </p>
    You need the image tag to display an image.
  • 29 about2flip // Dec 07, 2009 at 06:37 PM

    Artwork: <%= image_tag @submit.artwork.url %>

    this is what i have. I placed paperclip in my submits table, and I am using artwork instead of avatar. This is what it is displaying: Artwork: Jpeg original_path: craig
  • 30 pat // Dec 07, 2009 at 07:09 PM

    Weird… I’m not sure what could be causing that to appear. I would check your log file for errors or exceptions. It almost looks like the @submit object’s attributes are being displayed on the screen. I would debug the problem by adding “puts” statements to your code leading up to the problem, and then try to see where things went wrong. Maybe start by using “puts @submit” in your controller and see what you get. Do you see the object you expect? Do its attributes look correct? Do you get a valid url from @submit.artwork.url? If you do see a problem, then work backward until you can find where the problem actually happened.

    Sorry it’s going to be hard for me to help unless you can send me enough code to be able to reproduce it here. Maybe send me a pastie or gist?

  • 31 about2flip // Dec 07, 2009 at 09:02 PM

    ok. Thanks. Is there a way for me to test to make sure that imagmagick is working correctly?
  • 32 about2Flip // Dec 07, 2009 at 09:31 PM

    Here is my pastie. http://pastie.org/private/tro4oe8fvmz4nn1bv2m7ya Thanks Pat.
  • 33 about2flip // Dec 07, 2009 at 09:52 PM

    Sorry to waste your comment space, but I noticed this in my db. Under artwork_file_name it is being saved: --- !ruby/object:File content_type: image/gif I know that can't be right, isn't that an error? and under artwork_content_type and artwork_file_size nothing is being saved. The date is showing Invalid date. Not sure if that information would help you out.
  • 34 pat // Dec 07, 2009 at 10:59 PM

    Found it! On line 13 of your form partial you have:
    <%= f.file_field :artwork_file_name %>
    … instead this should be:
    <%= f.file_field :artwork %>
    When the form is submitted with a file, Paperclip will catch the uploaded file and then set the artwork_file_name, artwork_file_size, etc., fields automatically. You don’t want to refer to those directly in your form's file field (you can use them elsewhere of course). What was happening was that Paperclip was getting confused since your uploaded artwork file was called “artwork_file_name” by accident.
  • 35 about2flip // Dec 08, 2009 at 07:27 AM

    THANK YOU!!! I guess that is why it is best to rest your eyes when doing this programming stuff. Can't believe I missed that, and I have probably looked at that line 100x. You Are The Best!!!
  • 36 about2flip // Dec 10, 2009 at 01:29 AM

    Hi Again. I want to know how can validate multiple attachment boxes. For Ex: I am using two attachment fields. 1. I have an attachment field where the artwork must be a .eps file, then 2. the other attachment field can be jpeg, gif, png. Thanks Again
  • 37 pat // Dec 10, 2009 at 10:29 AM

    To validate the image type, use “validates_attachment_content_type.” For example if you have two file attachments on one model you can use:

    validates_attachment_content_type :avatar,
      :content_type => ['image/jpeg', 'image/png'],
      :message => 'Avatar must be a JPEG or PNG file'
    validates_attachment_content_type :photo,
      :content_type => 'image/gif',
      :message => 'Photo must be a GIF'

    Checkout the ThoughtBot documentation for more details.

  • 38 about2flip // Dec 10, 2009 at 11:15 AM

    so do i have to create new models for each attachment field? and then run paperclip for each model? -Thanks
  • 39 pat // Dec 10, 2009 at 01:17 PM

    If you have a specific number of attachments (like 1, 2 or 3) per record then just repeat the has_attached_file code that number of times on a single model with a different attachment name each time, and then run the paperclip generator that number of times to generate paperclip columns for each attachment. But if you need to support any number of files per record, then you’ll need two models (and two database tables) with a has_many association.
  • 40 visof // Feb 27, 2010 at 08:12 AM

    hello, your article is very good , i used that but i need to do something , i have "Student" Model and want to add many photos for each student in the local fs, i should create directories by each student name in /public/pics as example, i did that in the controller in the show like that @student = Student.find(params[:id]) @student_name = @student.name @path = File.join("public","pics",@student_name) Dir.mkdir(@path) unless File.directory?(@path) now i can create directory for each student by their names to can save their photos , now i can't access @student_name from the model to set the options of have_attached_file to can save the photos for each student . can i do that , or in your view there is another best solution ? Thanks
  • 41 pat // Feb 27, 2010 at 04:29 PM

    Hi Visof, The problem you’re having is that the paperclip options (what you pass into has_attached_file) are for your model’s class, and not for each instance of your model. That is, the url, path and other paperclip options you set once for all students and not for each student.

    What you should do instead is create a second model to represent the image files; maybe call it “Photo” or “Image.” Then you would put “has_many :photos” and “accepts_nested_attributes_for :photos” in your Student class, and “belongs_to :student” in your Photo class. And then use has_attached_file in Photo, and not in Student. That way there’s one file attachment per Photo which is how paperclip was designed to work, and many photos per student. And the best part is that you don’t have to do any work with directories or files… paperclip and the nested_attributes Rails feature will handle all of that for you.

    You could follow the instructions in my article Scaffolding for complex forms using nested attributes and use my view mapper gem to create a form for students/has_many/photos, and then edit the view code to use paperclip.

    If you want, I can email you some more detailed instructions on how to do that.

  • 42 DontHassleTheCassel // May 03, 2010 at 09:23 AM

    Really awesome tutorial for someone like myself who is completely new to RoR. One thing to note: if you opt to install paperclip as a gem (which might be useful if you are using it for multiple applications), you will need to add one line to user.rb:

    require ‘paperclip’

  • 43 pat // May 03, 2010 at 10:21 AM

    Hi… thanks a lot! Glad the tutorial was helpful. And thanks for pointing out the possibility of using Paperclip as a gem. I haven’t tried that myself yet.

    FYI Probably you wouldn’t need an explicit “require” if you declared paperclip in your environment file. i.e.: Rails::Initializer.run do |config| … config.gem “paperclip” … end

    I haven’t tried this myself but I’m guessing this would work.

  • 44 Rodrigo Serradura // May 06, 2010 at 01:51 PM

    Hi,

    I’m brazilian railer and can I translate this tutorial and publish on my blog.

    Tks in advance, Serradura

  • 45 pat // May 06, 2010 at 02:06 PM

    Obrigado! Of course… please do; that would be great. Thanks so much… I’m glad you find it worth translating.

    Coincidentally, today I’m starting to write a new version of this tutorial that uses Rails 3. It might take me about a week or so before I’m done… I won’t change this version at all which works for Rails 2.x. I’ll let you decide whether or not to wait for the new Rails 3 Paperclip tutorial.

    FYI I speak and write Spanish myself, so maybe I should do a Spanish version?

  • 46 Stan // Jun 16, 2010 at 03:17 AM

    Pat si cree un modelo llamado photo con product_id para aplicarle paperclip y subir varias photos por product. Como podria llamar en un image_tag dentro de mi vista products a la primera photo del modelo photo?

    Ya que asi no funciona:

    <%= image_tag @products.photo.url(:thumb) %>

    Agradezco tus comentarios.

  • 47 pat // Jun 16, 2010 at 10:57 PM

    Hola Stan - que gracia ver español aqui! Si tienes varios photos por cada product (product has_many photos), en la vista “show” para un producto puedes usar:

    <% unless @product.photos.first.nil? %>
      <%= image_tag @product.photos.first.url(:thumb) %>
    <% end %>
    

    Acuérdate que si un producto no tiene ningun foto, tendrías un nil para product.photos.first; por eso usé “unless.”

    Translation for anyone else reading along: Pat if I created a model called photo with product_id to apply paperclip and upload various photos for each product. How could I call in an image tag in my products view the first photo from the photo model? It doesn’t work this way…

    <%= image_tag @products.photo.url(:thumb) %>

    Thanks in advance for your reply.

    Hi Stan – how nice to see Spanish here! If you have various photos for each product (product has_many photos), in your “show” view for a single product you could use:

    <% unless @product.photos.first.nil? %>
      <%= image_tag @product.photos.first.url(:thumb) %>
    <% end %>
    

    Remember that if a product has no photos at all, then you would have a nil for product.photos.first; that’s why I used “unless.”

  • 48 Paul // Jul 20, 2010 at 03:53 PM

    Great paperclip tutorial for rails newbies! Sometimes we just need a step-by-step tutorial to get started. Thanks!

  • 49 Charlie // Aug 29, 2010 at 02:40 PM

    Hi! Great tutorial.. I keep banging my head against the wall w/ a paperclip problem, and maybe you can help?

    I have a users model, and users have a ‘photo’ paperclip attachment for their profile pic. The uploads work fine when I create a new user, but I want a ‘edit profile photo’ page where users can change their photo, and i can’t get that to work… paperclip isn’t saving any of the new files at all.

    Do you know how I can make this work? Here is my controller:

    def edit_photo
      @user = User.find(session[:user_id])
      if request.post?
        @user.update_attribute('photo', params[:user][:photo])
        flash[:message] = "Profile updated"
        redirect_to :action => 'controlpanel'
      end
    end


    and from the user model:

    has_attached_file :photo,
      :path => ':rails_root/public/images/photos/:id/:style.:extension',
      :url => 'photos/:id/:style.:extension',
      :styles => {
        :comment => "34x34#",
        :thumb => "42x42#",
        :profile => "170x270#"
      },
      :default_url => 'photos/default/:style.jpeg'


    Thanks a ton!

  • 50 pat // Aug 29, 2010 at 09:47 PM

    Hi Charlie, You might want to take a look at my article Paperclip scaffolding - this explains how to create a working scaffolding app that uses Paperclip, allowing you to upload and then edit an attachment like you are trying to do.

    For now looking at your code it’s hard to guess exactly what’s wrong. First, double check your Rails log file - are there any error messages there? Also double check that you have :html => { :multipart => true } in your edit.htmb.erb or haml view file. You might have it in new.html.erb but maybe you forgot it in edit.html.erb. If you forget this, then the file won’t be uploaded at all when you edit a user. In your log file you should see something like this if your file is being uploaded properly:

    Parameters: {"user"=>{"photo"=>#<File:/ etc...


    If you’re still having trouble with this try to send me enough code to reproduce the problem and I’ll take another look. Good luck!

Leave a Comment