Learning to Read x86 Assembly Language
Writing assembly language is something best left for the experts. To write code that runs directly on your microprocessor you need to know how memory segmentation works, what the intended use of each register is, how codes executes in real and protected modes and much, much more. And, of course, modern compilers will usually produce faster, more optimized code than you ever could, without making any mistakes.
Reading assembly language, on the other hand, isn’t nearly as difficult and can be a useful skill to have: Someday you might need to debug code without having the original source. You’ll begin to understand what a microprocessor can and can’t do by reading it’s language directly. And you’ll appreciate and understand your favorite programming language even more after seeing your own code translated into low level machine instructions.
But most importantly, learning about assembly language can be a lot of fun.
Update: Akhmad Karimov just posted a Russian translation of this article on his web site.
Usually Reading Assembly Language Is No Fun At All
Unfortunately, most of us only see assembly language after something has gone wrong, terribly wrong, when we encounter something like this:
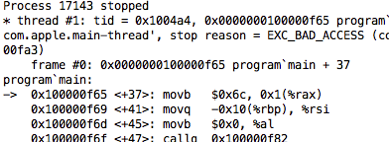
This is what a segmentation fault looks like in a debugger. The debugger shows me assembly language because it doesn’t know what else to show me. A “segmentation fault” means one of the assembly language instructions, for example the movb $0x6c, 0x1(%rax) line above, has tried to write to a portion of memory which it is not allowed to.
It’s no wonder that most of us dislike reading low level code like this. We only ever see it when we’re in the midst of debugging something, when the language and tools we normally rely on have let us down. We never see assembly language under happier circumstances; it is always the bearer of bad news.
Converting My Own Code to Assembly Language
This week I had some free time and decided to read some assembly language just for fun. I wanted to read low level code that was working properly, not code that was overwriting some other process's memory. I wanted to see if I could understand it like any other programming language. To make things easier, I decided to translate some of my own code into assembly language so I could focus on the assembly language syntax. It was easier to figure out what the instructions meant because I knew what they were doing.
I’m a Ruby developer, and so I was interested in knowing how my Ruby code would look translated into assembly language. Unfortunately, the Ruby interpreter (at least the standard “MRI” version of Ruby) never does this. Instead, the Ruby interpreter itself is compiled into machine language and runs my code using a virtual machine. But I wanted to see what a real machine would do, not a virtual one.
Instead I decided to use Crystal, a variation on Ruby that uses LLVM to compile Ruby to native machine language before running it. And because the LLVM system can also produce an assembly language version of the code it produces, using Crystal was the perfect way for me to see my Ruby code translated so a microprocessor could understand it.
I started by writing an extremely simple program that adds 42 to a given integer:
def add_forty_two(n)
  n+42
end

puts add_forty_two(10)
This was both Ruby code:
$ ruby add_forty_two.rb
52
And Crystal code:
$ crystal add_forty_two.rb
52
Both produced the same result, of course. But only Crystal could produce a copy in assembly language:
$ crystal build add_forty_two.rb --emit asm
This created a file called add_forty_two.s which contained 10,000s of lines of assembly language code. (Most of this was the compiled version of the Crystal runtime library.) I opened add_forty_two.s in a text editor and searched for “add_forty_two,” the name of my function. First I found the call site, the code that calls my add_forty_two function:
I’ll return to this a bit later. Searching again I found the x86 assembly language version of my function:
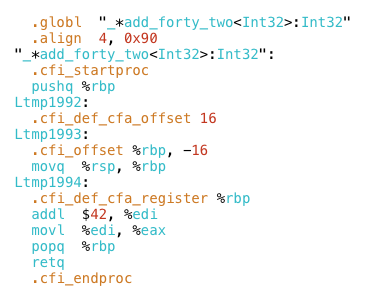
Next, I deleted all of the assembler directives, such as .globl and .cfi_offset. Someday it would be interesting to learn about these, but I wanted to focus on the actual machine instructions. And finally I pasted the the remaining code inside of my Ruby function.
Then I saw what my computer actually does when it executes add_forty_two:
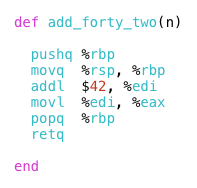
x86 Assembly Language: Almost Easy to Read
This code is almost easy to follow. I can guess what each instruction means: push, add, move, etc., but I can’t quite follow what’s going on here. mov probably means to move, but what is the computer moving? And from where to where?

Was x86 assembly language designed in Hungary?
The problem is that x86 assembly language was designed by Hungarians. I don’t mean that literally; in fact, I have no idea who designed x86 assembly language. I mean that x86 code reminds me of the Hungarian language.
I lived in Budapest for about a year in 1992 and managed to become conversational in Hungarian, although I’ve forgotten all of it since. A beautiful language, Hungarian is notoriously difficult for foreigners to learn. Related only to Finnish and Estonian, its grammar doesn’t resemble Italian, French or other romance languages; nor does it resemble Russian or any of the other Slavic languages from Eastern Europe.
The one bit of Hungarian grammar I still remember is that instead of using separate words for prepositions, such as inside, outside, etc., you append different suffixes to the target word. For example “inside the house” would be a házban. House is ház while inside is ban. Similarly “in Budapest” would be Budapesten - the en suffix means “in.” x86 assembly language code reminds me of Hungarian. You don’t use mov to move something; you use movq. You don’t add something; you use the addl instruction.
It turns out x86 assembly is much simpler than Hungarian; there are only a few simple suffixes that refer to the size of the data you are operating on. Here are two examples:
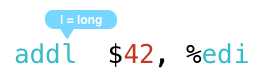
The addl instruction really means “add long,” where “long” refers to a 4 byte or 32 bit value. In Crystal, it corresponds to the Int32 type, which is the default integer type and the type my add_forty_two method uses.
Here’s another example:

The letter q refers to a “quad” word, or an 8 byte or 64 bit value. Most x86 code these days works with 64 bit or 32 bit values, so you’ll most often see instructions that end with q or l. Other suffixes are w for word (16 bits or 2 bytes) or b for 1 byte or 8 bits.
x86 Registers
But what about all of the operands of the instructions? Why do they all have a "%" prefix, such as %rsp or %edi? Reading x86 assembly language also reminds me of reading Perl code. Lots of punctuation symbols for no apparent reason. Similar to Perl, x86 assembly language uses sigils or magical punctuation characters to indicate the type of each operand value.
Here are my two example instructions again:
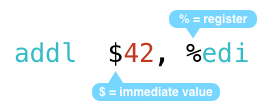
Here the "$" symbol means the 42 is a literal or “immediate” value. As you might guess, this is the line of code that adds 42 to something. But what does it add it to? From the "%" character we can see the x86 code is adding 42 to the edi register.
And what is a register? In a nutshell, the microprocessor inside your computer uses registers to hold values while your code is running. So the instruction above adds 42 to whatever value is contained in the edi register, and saves it back into edi.
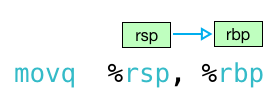
Here’s the second example again:
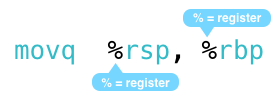
This instruction, movq, refers to two registers: rsp and rbp. As you can guess, it moves whatever value is found in the rsp register to the rbp register.
How many registers are there? What are they called? Let’s look at them using LLDB:
(lldb) register read
General Purpose Registers:
       rax = 0x0000000100300268
       rbx = 0x0000000000000000
       rcx = 0x00007fffd8132201  libsystem_kernel.dylib`__shmsys + 9
       rdx = 0x0000000000000000
       rdi = 0x000000000000000a
       rsi = 0x00007fff5fbff898
       rbp = 0x00007fff5fbffa30
       rsp = 0x00007fff5fbff908
        r8 = 0x0000000100014b60  add`sigfault_handler
        r9 = 0x0000000100400000
       r10 = 0x0000000000000000
       r11 = 0x0000000000000206
       r12 = 0x0000000000000000
       r13 = 0x0000000000000000
       r14 = 0x0000000000000000
       r15 = 0x0000000000000000
       rip = 0x0000000100013cd0  add`*add_forty_two:Int32
    rflags = 0x0000000000000202
        cs = 0x000000000000002b
        fs = 0x0000000000000000
        gs = 0x0000000000000000
You can see there are over 20 registers inside my Mac’s Intel CPU, each containing a 64 bit or 8 byte value. LLDB shows the values in hexadecimal. I don’t have time today to explain what all of these registers are used for, but here are a few highlights:
-
rax, rbx, rcx and rdx are general purpose registers used to hold on to intermediate values loaded from memory or used during a calculation of some kind.
-
rsp is the stack pointer, which holds the memory location of the top of the stack.
-
rbp is the base pointer, which holds the memory location of the base of the current stack frame
-
rip is the instruction pointer, which holds the memory location of the next instruction to execute
-
and rflags holds a series of flags, used by comparison instructions for example.
In fact, there are many more registers in a modern x86 microprocessor; LLDB is only showing me the most commonly used registers. For a complete explanation, the definitive guide to all of this is the Intel Software Developer’s Manual. Fortunately, my function’s assembly language code only uses a few registers. I don’t need to understand them all.
 Registers available in the x86 instruction set
But wait a minute. Why does my addl instruction refer to the edi register? This isn’t in the list of registers shown by LLDB. Where does this add operation occur? What register does it use?
It’s those Hungarian designers again. It turns out that x86 assembly language also decorates the register names to indicate their sizes, similar to what we saw above with the instruction name suffixes. But for register names x86 syntax uses prefixes, not suffixes. (In C programming Hungarian notation actually refers to the practice of using prefixes on variable names to indicate their type.)
What? This is a crazy! Why would any programming language use prefixes to indicate data size in one place, but then use suffixes to indicate the same thing somewhere else? To understand this, you have to remember that assembly language syntax wasn’t developed overnight. Instead, it gradually evolved of the course of many years. Originally, the registers used simple two letter names: ax, bx, cx. dx, sp and ip. These were the registers on the original 8086 16-bit microprocessor from the 1970s. Later in the 1980s when Intel built 32 bit microprocessors, starting with the 80386, they renamed (or extended) the ax, bx, cx, etc., registers to become eax, ebx, ecx, etc. These were later renamed again to rax, rbx etc. for 64-bit processors.

As you can see here, even today x86 assembly code can refer to the same register using many different names, for example al or ah for 8-bits, ax bit 16 bits, eax for 32 bits and rax for 64 bits.
x86 Assembly Language: Reads Left to Right, Except When It Reads Right to Left
Returning to the move instruction from above, how do we know which way the move happens?
That is, does this instruction move data from rsp to rbp? Or from rbp to rsp? Does it read left to right, or right to left?
It could be either! It turns out there are two versions of x86 syntax: "AT&T or GNU Assembler (GAS)" syntax, which I’ve been using until now, and also "Intel" syntax. GAS reads left to right:
But equally valid and common is the Intel syntax, which reads right to left:
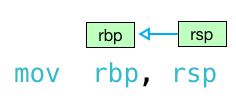
If you see Perl-like sigils (%rsp and %rbp for example) then you’re reading GAS syntax and values will move from left to right. If you don’t see any "%" or "$" signs, then you have Intel syntax and values move right to left. Also notice the Intel syntax doesn’t append “q” or “l” on to the instruction names. This article does a great job explaining the differences between the two styles.
What a train wreck! It’s hard to imagine a more confusing state of affairs. But again, remember all of this has evolved over the course of 40 years. It wasn’t designed by any single person at any one time. There’s a tremendous amount of history behind each x86 assembly language instruction.
Executing My Simple Program
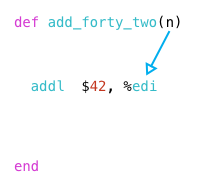
Now that I understand the basics of x86 assembly language syntax, I’m ready to return to my add_forty_two code and to try to understand how it works. Here it is again:
Reading the 6 instructions inside of add_forty_two, there are three different operations going on. First, we setup a new stack frame for our function:

The stack frame is an area of memory that my code can use to save local variable and other information. I won’t spend time on this today because my code is so simple it doesn’t use any local variables. The last two instructions clean up this stack frame and return to the calling code:

I won’t cover this today either. In my next article, I’ll go through a slightly more complicated example containing local variables and explain how x86 assembly code accesses them on the stack.
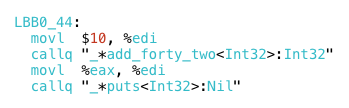
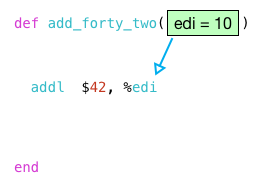
For today, I want to focus on the two instructions in the middle which actually implement add_forty_two:
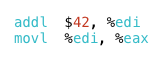
We’re down to two assembly language instructions, but it’s still far from obvious what this code means! The key to understanding these two instructions is to realize that the argument to my function, n, is passed in using a register:
We can see this is true by returning to the call site in the add_forty_two.s file, to the code which calls my function:
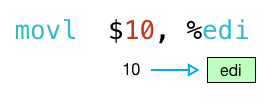
Note how the first movl instruction copies the value 10 into the edi register (the lower 32 bits of the rdi register):
Next the callq instruction calls my function with 10 in edi:
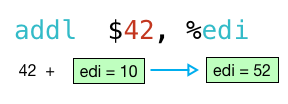
So when the addl instruction runs, it will add 42 to the argument 10.
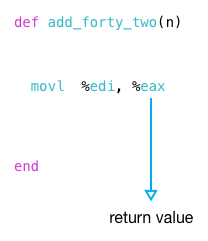
Next, the movl instruction runs and copies the result 52 from edi to eax:
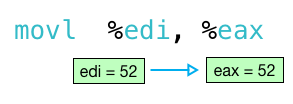
This, in turn, becomes the return value from my function:
Again, we can see this is the case by reading the call site code again:
What happens after add_forty_two returns? It moves %eax, the return value, to %edi where it becomes the argument to a second function call, the call to puts.
I’m not sure whether this pattern of using the %edi and %eax registers to hold the function arguments and return values is a x86 standard convention. My guess is that instead it’s a pattern the LLVM code generator uses. It may be that LLVM only uses this technique for a single argument and single return value function like add_forty_two.
Next Time
I haven’t done much, but already I’m beginning to understand x86 assembly language. Almost unintelligible when I first saw it, now I can start to follow what the machine instructions do when my code is executed. The key was learning how the instruction and register names change depending on the size of the value they operate on.
There’s much more to learn, of course. In my next article I’ll take a look at how an x86 microprocessor uses the stack to save values, and how this maps to Ruby using a slightly more complex example. Along the way I’ll learn about a few more important syntax rules of x86 assembly language.


