How Ruby Executes Your Code
This is an excerpt from the second chapter of an eBook I’m writing this Summer called “Ruby Under a Microscope.” My goal is to teach you how Ruby works internally without assuming you know anything about the C programming language.
If you’re interested in Ruby internals you can sign up here and I’ll send you an email when the eBook is finished. I also posted one entire chapter in May, and an excerpt from the first chapter last week.
 |
Now that Ruby has tokenized, parsed and compiled your code, Ruby is finally ready to execute it. But exactly how does it do this? We’ve seen how the Ruby compiler creates YARV (“Yet Another Ruby Virtual Machine”) instructions, but how does YARV actually run them? How does it keep track of variables, return values and arguments? How does it implement if statements and other control structures?
Just like your computer’s actual microprocessor hardware, Koichi Sasada and the Ruby core team designed YARV to use a stack pointer and a program counter. In this chapter, I’ll start by looking at the basics of YARV instructions: how they pop arguments off the stack and push return values onto the stack. I’ll continue by explaining how Ruby accesses variables in two different ways: locally and dynamically. Then I’ll show you how YARV implements Ruby control structures - including a look at how Ruby implements the break keyword internally by throwing an exception! Finally, I’ll compare the instruction sets used by the JRuby and Rubinius virtual machines to YARV’s instruction set.
YARV’s internal stack and your Ruby stack
… read it in the finished eBook.
Experiment 2-1: Benchmarking Ruby 1.9 vs. Ruby 1.8
… read it in the finished eBook.
Local and dynamic access of Ruby variables
… read it in the finished eBook.
Experiment 2-2: Exploring scope and variables using the binding object
… read it in the finished eBook.
How YARV controls your program’s execution flow

We’ve seen how YARV uses a stack while executing its instruction set and how it can access variables locally or dynamically, but what about control structures? Controlling the flow of execution is a fundamental requirement for any programming language, and Ruby has a rich set of control structures. How does YARV implement them?
Just like Ruby itself, YARV has it own control structures, albeit at a much lower level. Instead of if or unless statements, YARV uses two low level instructions called branchif and branchunless. And instead of using control structures such as while...end or until...end loops, YARV has a single low level function called jump that allows it to change the program counter and move from one place to another in your compiled program. By combining the branchif or branchunless instruction with the jump instruction YARV is able to execute most of Ruby’s simple control structures.
A good way to understand how YARV controls execution flow is to take a look at how the if/else statement works. Here’s a simple Ruby script that uses both if and else:
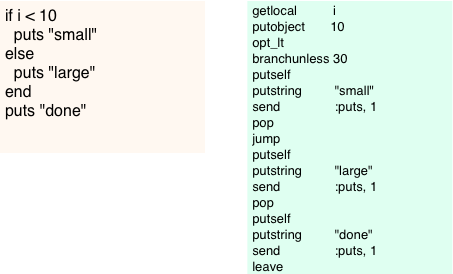
On the right you can see the corresponding snippet of compiled YARV instructions. I’ve simplified the YARV instructions a bit by removing the trace commands and a couple of other things. Reading the YARV instructions, you can see Ruby follows this pattern for implementing if/else statements:
- evaluate condition
- jump to false code if condition is false
- true code; jump to end
- false code
This is a bit easier to follow if I paste the instructions into a flowchart:

You can see how the branchunless instruction is the key to how Ruby implements if statements; here’s how it works:
- First at the top Ruby evaluates the condition of my if statement, i < 10, using the opt_lt (optimized less-than) instruction. This will leave either a true or false value on the stack.
- Then branchunless will jump down to the false/else condition if the condition is false. That is, it “branches unless” the condition is true. Ruby uses branchunless and not branchif for if/else conditions since the positive case, the code that immediately follows the if statement, is compiled to appear right after the condition code. Therefore YARV needs to jump if the condition is false.
- Or if the condition is true Ruby will not branch and will just continue to execute the positive case code. After finishing the positive code Ruby will then jump down to the instructions following the if/else statement using the jump instruction.
- Finally either way Ruby will continue to execute the subsequent code.
YARV implements the unless statement in a similar way using the same branchunless instruction, except the positive and negative code snippets are in reverse order. For looping control structures like while...end and until...end YARV uses the branchif instruction instead. But the idea is the same: calculate the loop condition, then execute branchif to jump as necessary, and finally use jump statements to implement the loop.
One of the challenges YARV has implementing some control structures is that, similar to dynamic variable access, Ruby sometimes can jump from one scope to another. The simplest example of this is the break statement. break can be used both to exit a simple loop like this:
i = 0
while i<10
  puts i
  break
  i += 1
end
puts "continue from here"
… or from a block iteration like this:
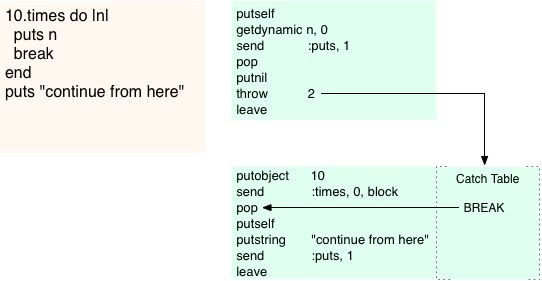
10.times do |n|
  puts n
  break
end
puts "continue from here"
In the first case, YARV can exit the while loop using simple jump instructions like we saw above in the if/else example. However, exiting a block is not so simple: in this case YARV needs to jump to the parent scope and continue execution after the call to 10.times. How does it do this? How does it know where to jump to? And how does it adjust both it’s internal stack and your Ruby call stack to be able to continue execution properly in the parent scope?
To implement jumping from one place to another in the Ruby call stack - that is, outside of the current scope - Ruby uses the throw YARV instruction. That’s right: internally Ruby implements break from within a block by throwing an exception!
Let’s take a look at how that works; here’s the compiled code for the block above containing the break statement:
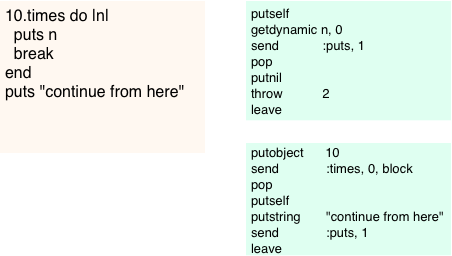
You can see a throw 2 instruction appears in the compiled code for the block. Throw implements throwing an exception at the YARV instruction level by using something called a “catch table.” A catch table is a table of pointers optionally attached to any YARV code snippet. Conceptually, a catch table might look like this:
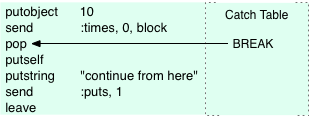
Here, the catch table from my example contains just a single pointer to the pop statement, which is where execution would continue after an exception. Whenever you use a break statement in a block, Ruby not only compiles the throw instruction into the block’s code, but it also adds the BREAK entry into the catch table of the parent scope. For a break within a series of nested blocks, Ruby would add the BREAK entry to a catch table even farther down the rb_control_frame stack.
Later, when YARV executes the throw instruction it checks to see whether there’s a catch table containing a BREAK pointer for the current YARV instruction sequence:
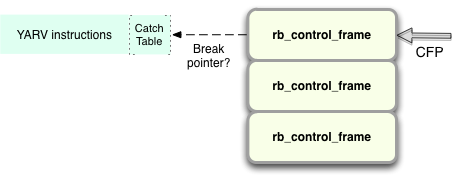
If there isn’t, Ruby will start to iterate down through the stack of rb_control_frame structures looking for a catch table containing a BREAK pointer...
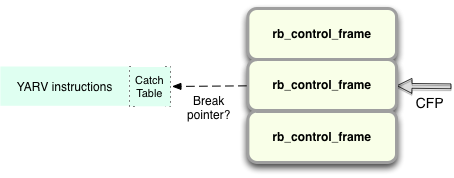
… and continue to iterate until it finds one:
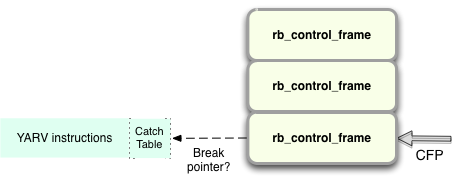
In my simple example, there is only one level of block nesting, so Ruby will find the catch table and BREAK pointer after just one iteration:
Once Ruby finds the catch table pointer, it resets both the Ruby call stack (the CFP pointer) and the internal YARV stack to reflect the new program execution point. Then YARV continues to execute your code from there. That is, YARV resets the internal PC and SP pointers as needed.
What is interesting to me about this is how Ruby uses exceptions internally to implement a very commonly used control structure: the break keyword. In other words, what in more verbose languages is an exceptional occurrence becomes in Ruby a common, everyday action. Ruby has wrapped up a confusing, unusual syntax - throwing/catching of exceptions - into a simple keyword, break, and made it very easy to understand and use. Of course, Ruby needs to use exceptions because of the way blocks work: they are on one hand like separate functions or subroutines, but on the other hand just part of the surrounding code. For this reason Ruby needs a keyword like break that seems simple at first glance but internally is quite complex.
Another commonplace, ordinary Ruby control structure that also uses catch tables is the return keyword. Whenever you call return from inside a block Ruby internally throws an exception and catches it with a catch table pointer like this. In fact, break and return are implemented with exactly the same YARV instructions; the only difference is that for return Ruby passes a 1 to the throw instruction (e.g. throw 1), while for break it passes a 2 as we saw above. The return and break keywords are really two sides of the same coin.
Finally, besides BREAK there are other types of pointers that Ruby can use in the catch table. The others are used to implement different control structures: rescue, ensure, retry, redo and next. For example, when you explicitly raise an exception in your Ruby code using the raise keyword, Ruby implements the rescue block in a similar way by using the catch table, but this time with a RESCUE pointer. The catch table is simply a list of event types that can be caught and handled by that sequence of YARV instructions, similar to how you would use a rescue block in your Ruby code.
Experiment 2-3: How Ruby compiles different control structures into YARV instructions
… read it in the finished eBook.
High level vs. low level VM instructions - comparing how JRuby and Ruby 1.9 compile your code
… read it in the finished eBook.
Comparing Rubinius high level instructions with LLVM's low level instructions
… read it in the finished eBook.