Contributing a new scaffold to ScaffoldHub
Last month I launched http://scaffoldhub.org, a gallery of different Rails scaffolding generators. Initially I posted three scaffolds myself to get the site started.
I just updated the site now to allow anyone to login and contribute new scaffolds... if you like the idea please think about contributing a scaffold! I hope it can someday become a helpful resource for the Rails community. If you do decide to try to write and contribute a scaffold: thanks! Please contact me anytime and I’ll try my best to answer any questions, improve the process or fix bugs.
To lower the bar for contributing, I looked for a design that hopefully makes it very easy to write and post a new scaffold generator; in fact, you don’t even need to write a generator at all. Read on to learn more...
Step 1: Create an account on scaffoldhub.org
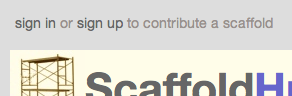
You can create a new account on ScaffoldHub by clicking the “sign up” link on the top left:
The site will take a username and password, and optionally an email address and home page URL:
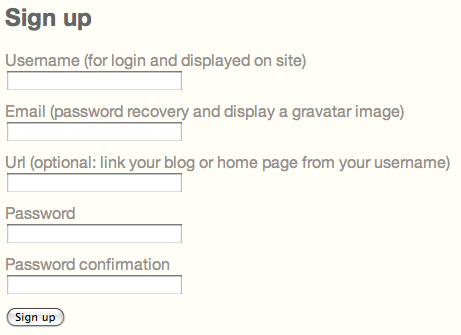
If you provide an email address, ScaffoldHub will display your gravatar next to all the scaffolds that you create. And if you have a blog or home page, enter that URL and ScaffoldHub will display your username as a link to that site.
Later you provide your credentials on the command line when you push your new scaffold up to ScaffoldHub using the scaffoldhub gem.
Step 2: Write your new scaffold
To write a new scaffold for ScaffoldHub, you first need to write a Ruby code file called a “scaffold spec.” Here’s an example:
Scaffoldhub::Specification.new do

  # Github URL where you will post your scaffold - the specified folder must contain this file
  base_url  'https://github.com/your_name/your_repo'

  # The name of your new scaffold: should be a single word
  name 'example'

  # Metadata about this scaffold - these values are only used for display on scaffoldhub.org:
  metadata do

    # A short paragraph describing what this scaffold does
    description 'The example scaffold.'

    # 4x3 aspect ratio screen shot
    screenshot 'example_screenshot.png'

    # Tag(s) to help scaffoldhub.org users find your scaffold
    tag 'jquery'
    tag 'autocomplete'

    # Optionally specify an example of a scaffold parameter
    parameter_example 'FIELD_NAME'

    # Optionally post a link to an article you write explaining how the scaffold works.
    blog_post 'https://patshaughnessy.net/2011/3/13/view-mapper-for-rails-3-scaffoldhub'
  end

  # Define a model template - this ERB file will be used to generate a new
  # model class with this path & filename: app/models/NAME.rb
  model 'templates/model.rb'

  # Define an ActiveRecord migration template - this ERB file will be used to generate a new
  # migration class with this path & filename: db/migrate/TIMESTAMP_create_PLURAL_NAME.rb
  migration 'templates/migration.rb'

  # Define a controller template - this ERB file will be used to generate a new
  # controller class with this path & filename: app/controllers/PLURAL_NAME.rb
  controller 'templates/controller.rb'

  # You can use "with_options" to specify the same source folder for a series of templates.
  # You can also specify the same destination folder using the :dest option,
  # or just use the :src and :dest options separately on each keyword.
  with_options :src => 'templates' do
    view '_form.html.erb'
    view 'new.html.erb'
    view 'edit.html.erb'
    view 'index.html.erb'
    view 'show.html.erb'
  end

  # Other keywords available are:

  # Define any other generic template - this ERB file will be used to generate
  # a new file - the dest option is required to indicate where to put the new file
  # template 'xyz.html.erb', :dest => 'path/to/xyz.html'

  # Copy any file without running an ERB transformation
  # file 'xyz.html', :dest => 'path/to/xyz.html'

end
As you can see, this file describes in a simple way what files your scaffold will generate on the end user's machine. It refers to a series of ERB templates that you would write also. In the “metadata” section, the scaffold spec provides some additional info that is only used for display purposes on scaffoldhub.org.
The scaffoldhub gem provides a generator called “new_scaffold” to help save you some typing; run it inside of any Rails 3 app to generate the scaffold spec above along with a copy of the standard Rails scaffold generator ERB templates that are mentioned in the example spec:
$ rails generate new_scaffold example
      create  example_scaffold/scaffold_spec.rb
      create  example_scaffold/example_screenshot.png
      create  example_scaffold/templates/_form.html.erb
      create  example_scaffold/templates/edit.html.erb
      create  example_scaffold/templates/index.html.erb
      create  example_scaffold/templates/new.html.erb
      create  example_scaffold/templates/show.html.erb
      create  example_scaffold/templates/model.rb
      create  example_scaffold/templates/migration.rb
      create  example_scaffold/templates/controller.rb
This example screenshot image is also generated:

Step 3: Test your new scaffold locally
Before pushing your new scaffold to ScaffoldHub, you should test that it works locally. To do this, run the scaffoldhub generator with the “--local” option set, and specify the local path of the scaffold spec file as the scaffold, for example like this:
$ rails generate scaffoldhub person name:string --scaffold example_scaffold/scaffold_spec.rb --local
      invoke  active_record
      create    db/migrate/20110430115456_create_people.rb
      create    app/models/person.rb
      invoke    test_unit
      create      test/unit/person_test.rb
      create      test/fixtures/people.yml
       route  resources :people
      invoke  scaffold_controller
      create    app/controllers/people_controller.rb
      invoke    erb
      create      app/views/people
      create      app/views/people/_form.html.erb
      create      app/views/people/new.html.erb
      create      app/views/people/edit.html.erb
      create      app/views/people/index.html.erb
      create      app/views/people/show.html.erb
      invoke    test_unit
      create      test/functional/people_controller_test.rb
      invoke    helper
      create      app/helpers/people_helper.rb
      invoke      test_unit
      create        test/unit/helpers/people_helper_test.rb
      invoke  stylesheets
      create    public/stylesheets/scaffold.css
You might get errors here if there are mistakes in the scaffold spec file, or in one of the ERB templates, for example. Fix and repeat as necessary. Once the scaffoldhub generator runs cleanly, then you can test that your generated scaffolding code also works.
Also be sure to take a screen shot so people can see what your new scaffolding will look like on scaffoldhub.org, even before they run it. On a Mac you can use Cmd-Shift-F4 to capture part of your screen; try to capture or crop your screen shot image so that it uses a 4x3 aspect ratio. Then save this image into your new scaffold folder and reference it the scaffold spec, similar to the example_screenshot.png file generated above.
Step 4: Push your new scaffold code to github
The ScaffoldHub generator works by downloading your ERB template files onto the end user’s machine. To make this possible you need to post your scaffold template files somewhere online; github is the natural choice for this. Posting your ERB template files on github also allows end users to see what code will be run when they install your scaffold.
To do this, type in your github repo’s URL into the scaffold spec file as the value for “base_url,” like this:
# Github URL where you will post your scaffold - the specified folder must contain this file
base_url  'https://github.com/your_name/your_repo'
Then push your scaffold spec file along with your ERB templates to this repo. Be sure that the relative location of each of the ERB templates specified in the scaffold spec is correct, and that the base_url indicates the github repo folder that contains the scaffold spec file.
As an example, the three scaffolds I’ve posted so far on ScaffoldHub are located on github here: https://github.com/patshaughnessy/scaffolds. You could even just fork my scaffolds repo and use that as a starting point for writing a new scaffold.
Step 5: Push your new scaffold to scaffoldhub.org
Finally, you can push the new scaffold to scaffoldhub.org by using a single command:
$ scaffoldhub push example_scaffold/scaffold_spec.rb
When you run this command, you will have to provide your scaffoldhub.org credentials. Also, the scaffoldhub gem will validate that all of the ERB templates and the screen shot image file specified in the scaffold spec are present on github in the correct locations relative to the base_url you indicated.
If everything looks good, then the ScaffoldHub gem will compile your scaffold spec and post it to the site, and you should be able to see your new scaffold at this URL:
http://scaffoldhub.org/scaffolds/[NAME]
... and end users will immediately be able to use it in their apps!
If you later discover a mistake, or just decide to change how the scaffold works or looks, then you just need to update the ERB templates in your github repo... no need to re-push the scaffold. If you make a change to the scaffold spec or screenshot image file, just repeat the “scaffoldhub push” command to recompile it and update the info on scaffoldhub.org immediately.