Don’t be terrified of building native extensions!
 |
| It's time for all Ruby developers to confront their worst fear... |
One of the scariest moments in the life of a Ruby developer is seeing that dreaded message appear as you try to install a new gem: Building native extensions. This could take a while.... As the console output suddenly hangs, you feel a horrible, sinking sensation of fear in your stomach: something truly bad is about to happen! Then your worse nightmare comes true: in the console you get: ERROR: Failed to build gem native extension. Now you’re condemned to spending hours googling for obscure compiler flags, environment settings or Linux package info - and not doing Ruby development.
For years I’ve been nervous installing gems that contained native extensions because I wasn’t familiar with the gem extension build process, and had no idea where to begin when something went wrong. Today I’m going to confront my own worst fears – and yours – by taking a closer look at what “Building native extensions” actually means. After reviewing how the build process works, I'll give you some advice that will hopefully point you in the right direction the next time you run into a problem.
What are native extensions anyway?
Before we get to what might go wrong building native extensions, let’s take a look at what native extensions are and why Ruby developers need them. “Native extensions” are the glue that connects a Ruby gem with some other non-Ruby software component or library present on your machine. Here’s a simple diagram that shows the relationship between a Ruby gem and some software it uses:
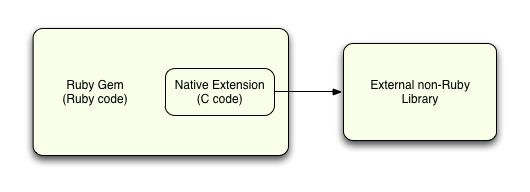
The native extension is some C code that’s included inside the Ruby gem that calls the external component’s API, converting the parameters and return values between the format the external library needs and what the Ruby interpreter expects. Native extensions are one of the reasons for the success of the Ruby platform, since they allow Ruby gem authors to take advantage of non-Ruby libraries when appropriate in an organized, standard way. This means that Ruby gem authors can use Ruby to do what Ruby is best at, but switch to C or some other programming language or library when that makes sense.
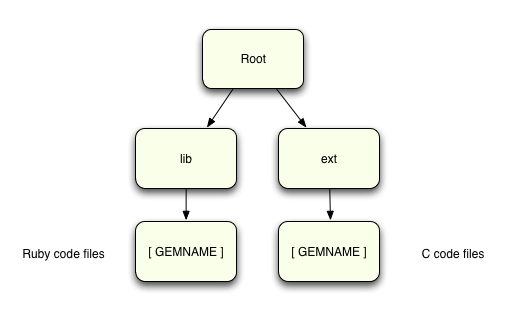
Here’s what the directory structure looks like for a Ruby gem that contains native extension code:
What’s the process for building a native extension?
The power of native extensions is also their biggest challenge. Since the extension code itself is written in C, it needs to be compiled into machine language for your specific platform and environment before you can use it. Rubygems provides a standard process for doing this; here’s what that looks like:

This is what’s actually happening while you’re reading the message Building native extensions. This could take a while....
The first step, shown at the top, is to run a Ruby script called “extconf.rb.” This is included in the ext/[GEMNAME] folder by the Ruby gem author, and is responsible for generating the C Makefile used in the next step. Extconf.rb inspects your laptop or server to find out what platform you have, what type of C compiler you have, which libraries are present and where they are located. The Makefile that it generates will then contain just the right C compiler settings you need to compile the gem’s C extension code - the gem author needs to write extconf.rb properly to guarantee this is always the case.
Once the Makefile is generated, Rubygems runs the make command in the ext/[GEMNAME] folder, causing your C compiler to be executed on each C code file present there, with all of the proper flags and settings. After all of the C code files are compiled, the Makefile also runs the C linker to build the new gem extension executable file.
Finally, the last step is to install the new native executable file into the proper directory, using the make install command. Now when the Ruby code in the gem calls a function implemented in the C extension code, the Ruby interpreter will be able to find the new native executable file.
If you’re interested in the details, you can try using the --verbose option the next time you install a gem containing native extensions, for example:
$ gem install sqlite3 --verbose
Conquering your fear: what to do when there’s an error
With so many different steps in the native extensions build process, there’s a good chance that something will go wrong. But what truly puts fear into our hearts is that whatever problems come up will have nothing to do with Ruby or anything about our Rails application, but instead will have to do with the obscure technical details of the external library we’re compiling against, or with the very low-level technical details or configuration of our computer.
But don’t lose hope, there are a few fairly simple things you can do after getting an error compiling native extensions that will often solve or at least avoid the problem you’ve run into. Let’s start with the most obvious, and the most effective way to avoid native extension terror...
Always use Homebrew or your Linux platform’s package manager
The most common problem you’ll run into while compiling native extension code is that either you’re missing the external library the code depends on entirely, or that it’s installed into the wrong place. For example, here’s what you’ll get if you try to install the “mysql2” gem but forgot that you’ve never installed MySQL itself onto your new Mac laptop:
$ gem install mysql2
Building native extensions.  This could take a while...
ERROR:  Error installing mysql2:
	ERROR: Failed to build gem native extension.

        /Users/pat/.rvm/rubies/ruby-1.8.7-p352/bin/ruby extconf.rb
checking for rb_thread_blocking_region()... no
checking for mysql_query() in -lmysqlclient... no
checking for main() in -lm... yes
checking for mysql_query() in -lmysqlclient... no


etc...

*** extconf.rb failed ***
Could not create Makefile due to some reason, probably lack of
necessary libraries and/or headers.  Check the mkmf.log file for more
details.  You may need configuration options.

Provided configuration options:
	--with-opt-dir
	--without-opt-dir
	--with-opt-include
	--without-opt-include=${opt-dir}/include
	--with-opt-lib
	--without-opt-lib=${opt-dir}/lib


...etc...


Gem files will remain installed in /Users/pat/.rvm/gems/ruby-1.8.7-p352/gems/mysql2-0.3.7 for inspection.
Results logged to /Users/pat/.rvm/gems/ruby-1.8.7-p352/gems/mysql2-0.3.7/ext/mysql2/gem_make.out
How terrifying! Instead of a simple, concise error message, we get about two pages of super-technical console output with multiple, confusing messages. But what all of this really means is that the C compiler can’t find the mysql.h and other C header files it needs to compile the mysql2 gem’s extension code.
The simple rule of thumb to remember in this situation is: be sure to use Homebrew to install MySQL or whatever library or server component you are missing, or use the package manager for your version of Linux. For MySQL you might be tempted to download a binary package from http://dev.mysql.com, or you might even want to build it from source yourself, but unless you really know what you are doing it’s easy to make a mistake and download the wrong version, or install it into a folder that the gem’s extconf.rb file doesn’t expect.
There are a few important reasons why Homebrew is the best choice here:
- It automatically determines the proper compiler settings for your platform and for the location of the other libraries you have.
- It will always install the new library or server in the proper location, usually under /usr/local where by default the Ruby extconf.rb file expects it to be.
- The smart people who wrote the Homebrew formula you are using had Ruby development in mind and most probably included just the package components you need, for example including mysql-devel in the mysql formula. This means you don’t have to worry about these details yourself. As it does for mysql, the Homebrew formulas can also automatically install important C-language patches that you probably would never be aware of or even know how to install.
So in this example we can solve the problem with a simple command:
$ brew install mysql
==> Downloading http://downloads.mysql.com/archives/mysql-5.5/mysql-5.5.15.tar.gz
etc...
and then repeat:
$ gem install mysql2
Building native extensions.  This could take a while...
Successfully installed mysql2-0.3.7
Of course, if you’re using Windows there’s no standard package manager and you have no choice but to install MySQL with a pre-built, binary install kit. This makes it less likely that the Rubygems native extensions compile process will find the package, and the compiler might depend on the PATH or other system settings to find the header and library files it needs. Using gems with native extensions on Windows is truly horrifying!
Look for a missing or incorrect configuration flag
If you have the package or server your gem depends on but the native extensions still don’t compile properly, then there might be some configuration settings that you need to provide in order for the C compiler to work. Usually these options indicate where some target package is located on your machine; they might also indicate your machine’s architecture (32 vs. 64 bit) or other things.
For example, if you want to use the “R” statistical programming language in your Ruby app, then you might try to install the rsruby gem like this:
$ gem install rsruby
Building native extensions.  This could take a while...
ERROR:  Error installing rsruby:
	ERROR: Failed to build gem native extension.

        /Users/pat/.rvm/rubies/ruby-1.8.7-p352/bin/ruby extconf.rb
checking for main() in -lR... no

ERROR: Cannot find the R library, aborting.

...etc...
As usual, there was a problem compiling the native extensions. But if you keeping reading the error message you’ll find some helpful information:
You may need configuration options.

Provided configuration options:
	--with-opt-dir

...etc...

	--with-R-dir
	--without-R-dir
	--with-R-include

...etc...
Reading the github readme page for rsruby, it turns out the option we need is --with-R-dir to indicate where the R language interpreter is installed. The proper command line is:
gem install rsruby -- --with-R-dir=/usr/local/Cellar/r/2.13.2/R.framework/Resources
This is a specific example of this command line pattern:
gem install xyz_gem -- --with-some=/path/i/need/to/provide
The first two dashes separate the Rubygems options from the C compiler options passed to the native extensions process.
If there’s not a lot of documentation for the gem you’re trying to install, then googling for each one of the available options listed in the console output will often take you to a StackOverflow or other discussion containing the magic setting you need to add. As a last resort you can dive in and just read the Ruby code inside extconf.rb to see what it’s looking for. Extconf.rb uses the mkmf Ruby library to generate the C Makefile, but even if you’re not familiar with mkmf most of the code you’ll find in extconf.rb will be fairly easy to understand, listing which directories to search in, which C header or library files to look for, etc. Usually there will be some clue here leading you in the right direction.
Note: if you’re using Bundler and don’t actually type in the gem install commands manually like this, you can specify these extension code settings using the bundler config command line like this:
bundle config build.XYZ --with-some-setting-required-to-compile=...
For the rsruby example above, I could have used bundler config like this:
bundle config build.rsruby --with-R-dir=/usr/local/Cellar/r/2.13.2/R.framework/Resources
Now everytime you run bundler on this machine, it will include the proper options for building the native extensions for rsruby, every time rsruby is installed again. This will most likely happen if you run bundle upgrade and get a newer version of rsruby, for example. FYI these config settings are saved in the “~/.bundle/config” file. For more details see the Bundler documentation.
You’re not out of the woods yet... remember to set environment variables!
Ok - you finally got your native extensions to compile properly, and the gem installed. Now you’re finally out of the woods and ready to get back to the Ruby development you were planning to do two hours ago, right?
Wait! Before continuing, double check whether the server or package you just installed to work with your new gem also requires some environment variables to be set. Ironically, these are often the same values, such as directory paths, that you needed to set using a gem install or bundle config option.
For example, the gem install command above will get the rsruby gem built and installed. But the R interpreter won’t actually work until you set the “R_HOME” environment variable properly:
export R_HOME=/usr/local/Cellar/r/2.13.2/R.framework/Resources
The same is true for Oracle and the ruby-oci8 gem, and for many other servers and packages.