How to integrate Amazon Simple Pay into a Rails 3 app
Amazon Payments is a great alternative to PayPal or Active Merchant - users of your site can pay you via their Amazon account and like with PayPal you don’t need to store credit card information in your own database. Another plus is they provide a special service tailored to non-profits, allowing users to make donations. We used this for ReliefHub, an online charity site I volunteered to work on last month.
Today I’ll show you how to create a simple scaffolding Rails site with an Amazon Payments button that looks like this:
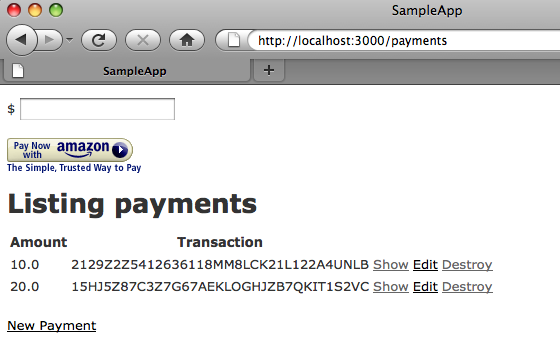
It will actually accept payments: users will be able to enter an amount, click “Pay Now” and then confirm the transaction on the Amazon site. Later they will be redirected back to the Rails site, and their transaction will appear in the index scaffolding view.
But first the hard part: dealing with the poor Amazon documentation, confusing admin web pages and numerous sign up forms. Bear with me! If you can suffer through the pain and confusion of the Amazon sign up process, it turns out to be quite easy to use Amazon Payments in a Rails 3 site.
Step 1: Sign up for Amazon Web Services
If you already use S3, EC2 or other Amazon web services, then skip to step 2. Otherwise, go to: http://aws.amazon.com, click “Sign Up Now” and enter your Amazon email address and password. Then you need to create a new web services account by filling out the “Contact Information” form and agreeing to the “AWS Customer Agreement.”
Step 2: Sign up for Amazon Payments
There are actually two different Amazon Payment Services sites: sandbox and production. The sandbox allows you to test transactions from your web site without using real money. You will have separate account IDs for Amazon Payments sandbox and production.
For now, let’s start with Amazon Payments Sandbox; open: https://payments-sandbox.amazon.com
You should see the word “sandbox” in the Amazon Payments logo at the top left:

Later when you are ready to deploy your Rails app and want to collect real money you’ll need to repeat steps 2, 3 and 4 using the production Amazon site: https://payments.amazon.com
From the Amazon Payments home page, click “Your Account” and then login again using your Amazon email address and password. After you enter your Amazon credentials, you’ll need to sign up and enter your contact information again, this time for Amazon Payments. Once you sign up, you should be redirected to your account page, which will display your account balance and recent transaction information.
Step 3: Sign up for the Amazon Flexible Payment Service (FPS)
Now for the confusing part: you need to sign up for a third time; this time for the “Amazon Flexible Payments Service.” To do this, click “Developers” and then click the “Sign Up For Amazon FPS” button on the right side of the page:

Now that you’ve signed up for Amazon FPS you should promptly decide not to use it. It’s very confusing, complex and provides little additional value compared to Amazon Simple Pay. You might want to consider Amazon FPS if you need to make payments programmatically on a scheduled basis with no user interface or buttons. If that’s the case, check out the Remit gem on github, which will make Amazon FPS/Rails integration easier.
Amazon Simple Pay, on the other hand, is a simple, straightforward way to add payment forms to your Rails site. That is, simple except for the sign up process and confusing documentation!
Step 4: Disable the “Sign the buttons” option
To improve security, Amazon Simple Pay normally requires that payment requests include an encrypted hash of the form values called a “signature.” For today, you should disable this to keep things simple. Later in a future post I’ll show how to generate the signature value in your Rails site, allowing you to enable this feature.
- Return to the https://payments-sandbox.amazon.com home page
- Go to: Your Account -> Edit My Account Settings -> Manage Developer and Seller Preferences
- Uncheck “Sign the buttons” if necessary
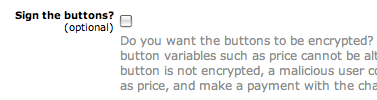
- Click “Confirm” at the bottom of the form if necessary.
Step 5: Create an Amazon Simple Pay button
Amazon Simple Pay is very easy to use since you can actually generate the HTML you need to create a payment form/button right on the Amazon Payments site. But it took me hours of clicking and searching to find the Amazon Payments admin page that allows you to generate the button.
Here’s a link to the create button form: https://payments-sandbox.amazon.com/sdui/sdui/standardbutton
Bookmark this or you’ll never find it again! There are other pages you can use to generate “Donate” buttons for non-profits, or other types of buttons. Now by filling out this form, you can create a payment form using one of the Amazon payment buttons, for example:

Here’s what to do:
- Click the link above
- Sign in again with your Amazon credentials if necessary
- Enter any values you want for Amount, Description, and Reference since we’re going to change them later in our Rails code.
- Enter any valid URL you want for “Return URL”. Later we’ll replace this with a Rails route.
- Leave User Abandon URL and URL for Instant Payment Notification blank.
- Leave the other default values unchanged.
- Select one of the Amazon buttons; later you can replace their button image with your own button, of course.
- Next, click “Generate HTML” and fix any form validations errors you get.
Now you should see HTML similar to this in the text area:
<form action="https://authorize.payments-sandbox.amazon.com/pba/paypipeline" method="post">
  <input type="hidden" name="immediateReturn" value="1" >
  <input type="hidden" name="collectShippingAddress" value="0" >
  <input type="hidden" name="signatureVersion" value="2" >
  <input type="hidden" name="signatureMethod" value="HmacSHA256" >
  <input type="hidden" name="accessKey" value="11SEM03K88SD016FS1G2" >
  <input type="hidden" name="referenceId" value="test" >
  <input type="hidden" name="amount" value="USD 10" >
  <input type="hidden" name="signature" value="avlT64an02VS0drWiNZj36rGz88JwvFmETKveYfzjJk=" >
  <input type="hidden" name="isDonationWidget" value="0" >
  <input type="hidden" name="description" value="test" >
  <input type="hidden" name="amazonPaymentsAccountId" value="KWKCCYNIVXJL42AE3FVCZCA65I3522JBV4EJVX" >
  <input type="hidden" name="returnUrl" value="http://test.com/return_url" >
  <input type="hidden" name="processImmediate" value="1" >
  <input type="hidden" name="cobrandingStyle" value="logo" >
  <input type="image" src="http://g-ecx.images-amazon.com/images/G/01/asp/beige_small_paynow_withmsg_whitebg.gif" border="0">
</form>
Copy and paste the HTML into a text file somewhere and hold onto it. By the way, there are two important values hidden in this HTML: your AWS access key, and also your Amazon Payments account ID. You’ll want to make a note of these values and save them somewhere also.
Step 6: Write a Rails app to collect payments
Thank goodness; we’re done with the Amazon Payments user interface! Now the fun part: let’s build a Rails 3.0 sample app to collect payments using the Amazon button we just generated:
$ rails new sample_app
    create
    create  README
    create  Rakefile
    create  config.ru
    create  .gitignore
    create  Gemfile
$ cd sample_app
And let’s create a model to hold our payment transactions - I’ll store just the amount and the transaction id for today. You could also store the user’s email, shipping address, etc.
$ rails generate scaffold payment amount:float transaction_id:string
      invoke  active_record
      create    db/migrate/20101119212749_create_payments.rb
      create    app/models/payment.rb
      invoke    test_unit
      create      test/unit/payment_test.rb
      create      test/fixtures/payments.yml
       route  resources :payments
      invoke  scaffold_controller
etc...
$ rake db:migrate
Now edit app/views/payments/index.html.erb and paste in the HTML from Amazon Simple Pay at the top:
<form action="https://authorize.payments-sandbox.amazon.com/pba/paypipeline" method="post"> <input type="hidden" name="immediateReturn" value="1" > <input type="hidden" name="collectShippingAddress" value="0" > <input type="hidden" name="signatureVersion" value="2" > <input type="hidden" name="signatureMethod" value="HmacSHA256" > <input type="hidden" name="accessKey" value="11SEM03K88SD016FS1G2" > <input type="hidden" name="referenceId" value="ref" > <input type="hidden" name="amount" value="USD 10" > <input type="hidden" name="signature" value="avlT64an02VS0drWiNZj36rGz88JwvFmETKveYfzjJk" > <input type="hidden" name="isDonationWidget" value="0" > <input type="hidden" name="description" value="desc" > <input type="hidden" name="amazonPaymentsAccountId" value="KWKCCYNIVXJL42AE3FVCZCA65I3522JBV4EJVX" > <input type="hidden" name="returnUrl" value="http://test.com/return_url" > <input type="hidden" name="processImmediate" value="1" > <input type="hidden" name="cobrandingStyle" value="logo" > <input type="image" src="http://g-ecx.images-amazon.com/images/G/01/asp/beige_small_paynow_withmsg_whitebg.gif" border="0"> </form><h1>Listing payments</h1>
<table> <tr> <th>Amount</th> <th>Transaction</th>
etc...
Aside from the important accessKey and the amazonPaymentsAccountId values, you might have noticed there’s another value called “signature,” along with “signatureVersion” and “signatureMethod.” As I mentioned above, the signature is actually an encrypted hash of all of the other form values. When users submit the form, Amazon will check that all of the form parameters are valid by comparing them against the signature value. The problem is that for Amazon “valid” means equal to what you entered on the Amazon create button form earlier - not what is actually valid for your site or business rules.
To make the Amazon Simple Pay form work with different payment amounts and with different return URLs (e.g. “localhost:3000” vs. your production hostname) we can’t use this signature security scheme... at least not for now. Later in a future blog post I’ll show a way to dynamically generate the signature value each time the payment form is submitted.
For now, let’s just delete the signature related values; remember we unchecked “Sign the buttons” earlier in the Amazon Payments site; setting this to false allows us to remove the signature value.
Also, you should change the Return URL to: “http://localhost:3000/confirm_payment.” This tells Amazon payments how to redirect the user back to our site after they have confirmed the payment.
Here’s what my payment index view looks like now:
<form action="https://authorize.payments-sandbox.amazon.com/pba/paypipeline" method="post"> <input type="hidden" name="immediateReturn" value="1" > <input type="hidden" name="collectShippingAddress" value="0" > <input type="hidden" name="accessKey" value="11SEM03K88SD016FS1G2" > <input type="hidden" name="referenceId" value="ref" > <input type="hidden" name="amount" value="USD 10" > <input type="hidden" name="isDonationWidget" value="0" > <input type="hidden" name="description" value="desc" > <input type="hidden" name="amazonPaymentsAccountId" value="KWKCCYNIVXJL42AE3FVCZCA65I3522JBV4EJVX" > <input type="hidden" name="returnUrl" value="http://localhost:3000/confirm_payment" > <input type="hidden" name="processImmediate" value="1" > <input type="hidden" name="cobrandingStyle" value="logo" > <input type="image" src="http://g-ecx.images-amazon.com/images/G/01/asp/beige_small_paynow_withmsg_whitebg.gif" border="0"></form>
<h1>Listing payments</h1>
<table> <tr> <th>Amount</th> <th>Transaction</th>
etc...
Next let’s add a new route for confirming payments; edit config/routes.rb:
SampleApp::Application.routes.draw doresources :payments match 'confirm_payment' => 'payments#confirm'
etc...
And now let’s write a new action in the payments controller for this; edit app/controllers/payments_controller.rb:
class PaymentsController < ApplicationController

def confirm
  @payment = Payment.new(
    :transaction_amount => params[:transactionAmount],
    :transaction_id     => params[:transactionId]
  )
  if @payment.save
    redirect_to(@payment, :notice => 'Payment was successfully created.')
  else
    redirect_to :action => "index"
  end
end

etc...
This looks similar to the create action we got from the scaffolding generator. This action will be called when users return from the Amazon Payments site, and will record the transaction in our application’s payments table. More on this in a moment.
Finally in the payment model we need a bit of code to parse the transaction amount string passed back from Amazon:
class Payment < ActiveRecord::Base

  validates_presence_of :amount
  validates_presence_of :transaction_id

  def transaction_amount=(currency_and_amount)
    currency = parse(currency_and_amount).first
    if currency == 'USD'
      amount = parse(currency_and_amount).last.to_f
    else
      amount = currency.to_f
    end
    self.amount = amount unless amount == 0.0
  end

  def parse(currency_and_amount)
    @parsed ||= currency_and_amount.split
  end
end
The “transaction amount” parameter from Amazon may contain a prefix “USD” specifying the currency. However, sometimes this is not present. The code above parses the string as necessary in a virtual attribute “transaction_amount” and then saves the corresponding amount as the “amount” float value in the database. The Payment model also validates that both amount and transaction id are specified by Amazon in order to consider the payment valid.
Now let’s fire up the app and try it out!
![]()
If you click the “Pay Now” button you’ll be redirected to Amazon:
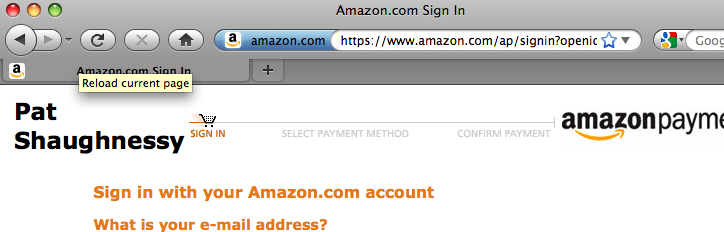
Your personal or business name should appear at the top left instead of my name. Next sign to Amazon with a different account and confirm the payment... you can’t use the same account you used to setup Amazon Simple Pay, since Amazon doesn’t allow someone to pay themselves. Also remember “sandbox” appeared in the form action URL, so there’s no need to worry about spending real money yet!
After you click “Confirm” you’ll be redirected back to our Rails sample app, to the page we gave Amazon in the “returnUrl” form field. Now you should see:
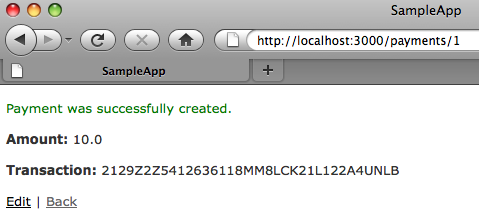
The transaction id and amount are now saved in the transactions table, which you can use for reporting or for other purposes in your user interface. This all worked as follows:
- Amazon sent a GET request to the URL we provided in the “returnUrl” field in the payment form.
- In this request, Amazon passed information about the transaction, such as the amount, the transaction id and other information like the buyer’s email address, name, shipping address - and a signature hash is also provided in case you want to be sure this request is from Amazon.
- Since our returnUrl was set to confirm_payment_url, our confirm action was called in the PaymentsController above.
- This creates a new Payment record, setting just the amount and transaction id values in this example.
- Finally, the Payment model parses the “transactionAmount” value from Amazon as I explained above.
Step 7: Using a helper to generate the payment form easily
Of course our view code is very ugly - all of that complex HTML is hard to read and confusing, and also if we want more than one button in our app we will have to repeat all of the HTML. The best thing to do render the payment form using a helper. This code will do the trick - save this code in app/helpers/amazon_simple_pay_helper.rb:
module AmazonSimplePayHelper

  AMAZON_ACCESS_KEY = '11SEM03K88SD016FS1G2'

  AMAZON_PAYMENTS_ACCOUNT_ID = 'KWKCCYNIVXJL42AE3FVCZCA65I3522JBV4EJVX'

  def amazon_simple_pay_form_tag(options = {}, &block)
    sandbox = '-sandbox' unless Rails.env == 'production'
    pipeline_url = "https://authorize.payments#{sandbox}.amazon.com/pba/paypipeline"
    html_options = { :action => pipeline_url, :method => :post }.merge(options)
    content = capture(&block)
    output = ActiveSupport::SafeBuffer.new
    output.safe_concat(tag(:form, html_options, true))
    output << content
    output.safe_concat(hidden_field_tag('accessKey', AMAZON_ACCESS_KEY))
    output.safe_concat(hidden_field_tag('amazonPaymentsAccountId', AMAZON_PAYMENTS_ACCOUNT_ID))
    output.safe_concat(hidden_field_tag('immediateReturn', '1'))
    output.safe_concat(hidden_field_tag('processImmediate', '1'))
    output.safe_concat(hidden_field_tag('cobrandingStyle', 'logo'))
    output.safe_concat(hidden_field_tag('returnUrl', confirm_payment_url))
    output.safe_concat("</form>")
  end

end
This helper uses the same code the standard “form_tag” Rails view helper does, except that it provides the additional fields and attributes required by Amazon. Here’s how it works:
- First it calculates the form action URL - the amazon payments sandbox URL from the HTML above. “Sandbox” is included in the URL unless your are running on your production server.
- It creates a SafeBuffer - this prevents Rails 3 from escaping the html.
- Then it writes the new form tag into this buffer with the Amazon form action URL and post method attributes.
- Next it yields to the provided block and appends whatever HTML is returned, allowing you to use a block in your view as usual.
- Finally it adds the other form fields that Amazon requires. “returnUrl” is still set to the confirm payment route we created earlier.
- You should move the two constants AMAZON_ACCESS_KEY and AMAZON_PAYMENTS_ACCOUNT_ID into one of your environment config files or even better into a YAML file somewhere.
Since this works like a normal form_tag, my view code is now much simpler and also familiar; it looks like any other Rails form:
<%= amazon_simple_pay_form_tag do %>
  $ <%= text_field_tag 'amount' %><br/><br/>
  <%= hidden_field_tag 'referenceId', 'something' %>
  <%= hidden_field_tag 'description', 'something else' %>
  <%= image_submit_tag('/images/pay_me.gif') %>
<% end %>
Here I’ve provided a different button image, and allowed the user to enter any payment amount with a real text field. I’ve also specified the reference id and description values here, since they are likely related to business rules and/or objects used elsewhere on this view page. To finish this off, I probably need to add some JQuery validation on the amount field.
Next time I’ll show how to sign the form dynamically before it’s submitted to Amazon, giving you the security benefit of the “Sign buttons” Amazon feature.